A Craftsman stud finder is a simple but effective tool that is used to locate studs and other metal objects, such as pipes and electrical cables, in a wall. But if you don’t know how to use it, how effective can your Craftsman stud finder be?
To use your Craftsman stud finder, you need to:
- Make sure the batteries are charged and installed properly.
- Calibrate your stud finder.
- Find the first side of your stud, then move to find the second stud.
Following these steps will help you use your Craftsman stud finder.
You can find steps on how to use a Craftsman stud finder on the back of its packaging and in the provided user’s manual, but if you don’t have either of these on hand, you can follow our guide here. We’ll walk you through every step of the process and provide helpful images along the way.
How to Use a Craftsman Stud Finder
Before you start drilling or cutting holes in walls, you absolutely have to know where you can and cannot work. Using a stud finder is the most efficient way to do this.
Before you can use your Craftsman stud finder, the correct batteries have to be installed and charged. Once you’ve done that, follow these steps:
- Calibrate your Craftsman stud finder.
- Slide the stud finder along the wall to locate the first side of a stud.
- Mark the location of this stud.
- Continue moving the stud finder until you locate the second stud.
Once you’ve followed these steps a few times, you’ll be able to easily use your Craftsman stud finder.
Install the Necessary Batteries for Your Craftsman Stud Finder
Craftsman sells several stud finder models that vary in design, features, and depth, but the one thing they all have in common is that they are battery-powered.
Before you can get started using your Craftsman stud finder, you’ll need to install the necessary batteries.
The type of batteries you’ll require for each model are listed in their associated user’s manual, but we’ve also listed them here for your convenience:
- CRAFTSMAN Stud Finder, 3-Inch Depth, AC Detection (CMHT77623): require two AAA alkaline batteries
- CRAFTSMAN Stud Finder, 3/4-Inch Depth (CMHT77633): requires one 9V battery
- CRAFTSMAN Laser Level and Stud Sensor, 20-Foot Visibility Range (CMHT77636): requires two AA alkaline batteries
- CRAFTSMAN Stud Finder, 3/4-Inch Depth, AC Detection (CMHT77620): requires two AA alkaline batteries
If your Craftsman stud finder is already equipped with batteries, you might want to test if they still have power before proceeding.
Calibrate Your Craftsman Stud Finder
It’s important to calibrate your stud finder before you start looking for studs or other features, as this allows the sensors to measure the wall density and other features.
This will result in the most accurate read possible when you start scanning.
Those of you who are the proud owners of a Craftsman stud finer model CMHT77623 or CMHT77620 can skip this step, as your tool is built with an auto-calibration feature.
To calibrate the Craftsman stud finder model CMHT77633 or CMHT77636, hold the tool flush against the wall, straight up and down. Next, press and hold the activation button on the side of the tool.
For the model CMHT77633 stud finder, the activation button is on the left side. You should hear a ringing/beeping sound and see the “edge” light turn on.
Once that same light turns off, your stud finder is calibrated.
For the model CMHT77636 stud finder, the activation button is on the right side (the left one is for the laser).
The LCD screen should light up and run an initialization process. Once the LED screen reads “READY,” and you hear the tool beep once, then your stud finder is calibrated.
Find The First Side of Your Stud
Now that your Craftsman stud finder is calibrated, you can find the first side of your stud.
If you have one of the auto-calibration models, place it flush against the wall pointing up and down, and hold the center detection button until all the LEDs (except the green Power LED) turn off, and then continue to hold the button.
If you have one of the other two models, keep your stud finder in place, as removing it from the wall will require you to recalibrate it and continue to hold the detection button.
Slowly slide your Crafstman stud finder horizontally along the wall until:
- Model CMHT77636: LED screen reads “STUD FOUND”
- Model CMHT77623 or CMHT77620: stud finder starts ringing, and the rede detection light turns on
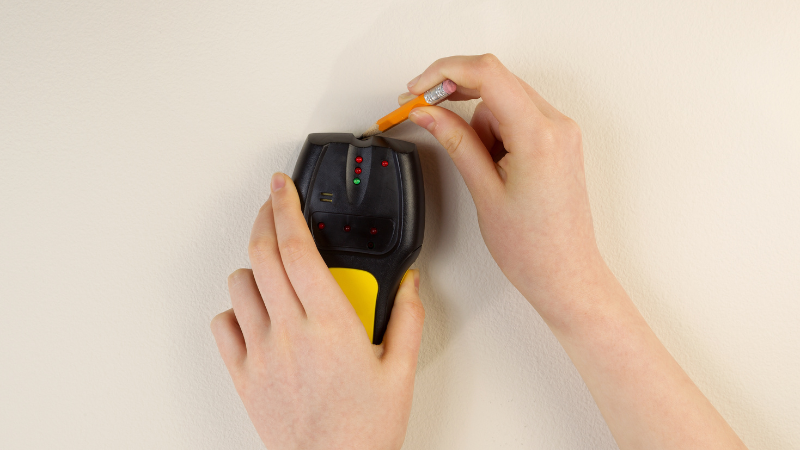
When this occurs, stop the stud finder where it is (remember to keep it flush against the wall) and then mark that spot with a pencil.
For the model CMHT77633, you’ll want to make this mark at the center of the top indentation. For the other models, you make this mark in the tool’s central marking channel.
Find Your Second Stud Location
After you’ve found and marked the first side of your stud, you can move on to locating the second side. How you go about this will vary slightly, depending on which stud finder model you own.
To find the second side of your wall stud, follow the steps provided for your stud finder model:
- Model CMHT77633: keep sliding your stud finder slowly along the wall until the ringing stops and the “edge” light turns off. Mark the point just before this transition.
- Model CMHT77636: keep sliding your stud finder slowly along the wall until “EDGE” appears on the LED screen. Mark this point and then continue sliding until the “STUD FOUND” message disappears.
- Model CMHT77623 or CMHT77620: remove your finger from the detection button and the stud finder from the wall.
- Move the stud finder slightly past what you think would be the edge of the stud’s other side, hold the detect button, and then slowly start sliding it horizontally towards the first stud mark you made until the tool beeps and the light turns on, indicating a stud. Mark this point.
Alternatively, you can use the method listed for models CMHT77623 and CMHT77620 for the other two models, but you’ll have to remember to recalibrate them before searching for the stud edge.
After you’ve parked at this second point, you’ll know where your wall stud is located and can find its center for drilling.
Final Thoughts
Now that you know where your wall studs are located, you can drill your holes and move ahead with your installation or renovation plans.
If you have any other questions concerning your Craftsman stud finder, check the user manual that comes with it. You can also find these online if necessary.

